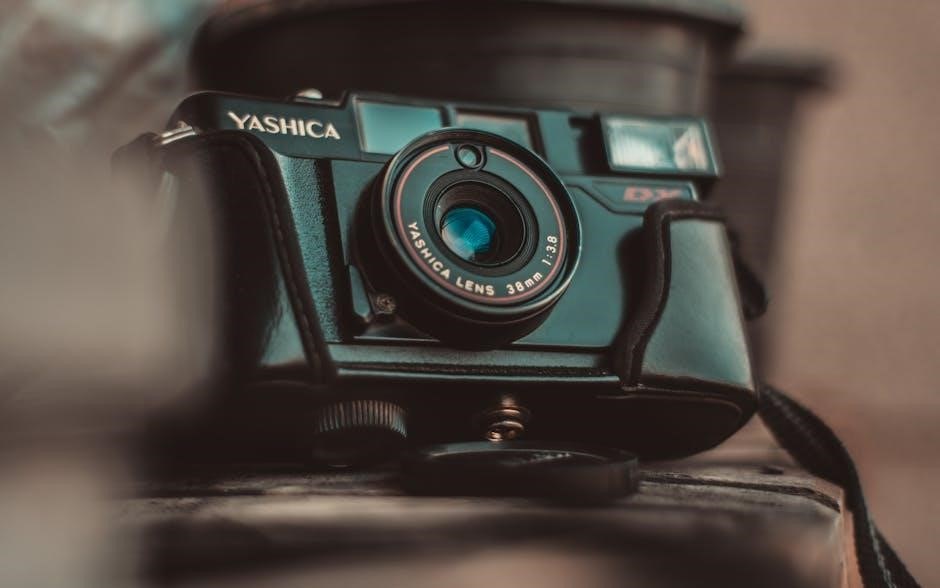
Yashica 124G: A Comprehensive Guide
This guide compiles resources for the Yashica 124G, including repair manuals, instruction booklets, and service documentation.
Find exploded views,
meter calibration details,
and winding mechanism servicing information.
Access both PDF and text file formats
for easy reference and troubleshooting.
The Yashica 124G represents a pinnacle of medium format Twin-Lens Reflex (TLR) camera design, celebrated for its exceptional image quality and robust build.
Numerous resources exist to support owners, ranging from comprehensive instruction booklets detailing operation to detailed service manuals for repair and maintenance.
These manuals, often available as downloadable PDFs, cover everything from basic loading and unloading procedures to advanced techniques like exposure meter calibration.
Understanding the camera’s features is greatly enhanced by accessing these guides.
Whether you’re a seasoned photographer or new to film, the Yashica 124G’s manual provides invaluable insights into its functionality.
The availability of exploded views within the service manual is particularly useful for those undertaking repairs, allowing for a clear understanding of the camera’s internal components.
These resources ensure the longevity and optimal performance of this classic camera, making it a rewarding experience for any photographer.
Historical Context and Significance
The Yashica 124G, released in the 1970s, quickly became a favorite among photography enthusiasts seeking a high-quality, yet relatively affordable, medium format TLR camera.
Its significance lies in offering professional-level features – like a sharp lens and accurate metering – within reach of a wider audience.
The enduring popularity of the 124G is reflected in the continued availability of support materials, including detailed manuals and service documentation.

These manuals aren’t merely guides to operation; they represent a preservation of photographic history.
They allow modern photographers to understand the design philosophies and engineering principles behind this iconic camera.
The existence of readily accessible repair manuals demonstrates a commitment to keeping these cameras functioning for generations.
The Yashica 124G’s legacy is thus secured, not only through its photographic capabilities but also through the wealth of information available to its users and maintainers.

Understanding the Camera’s Features
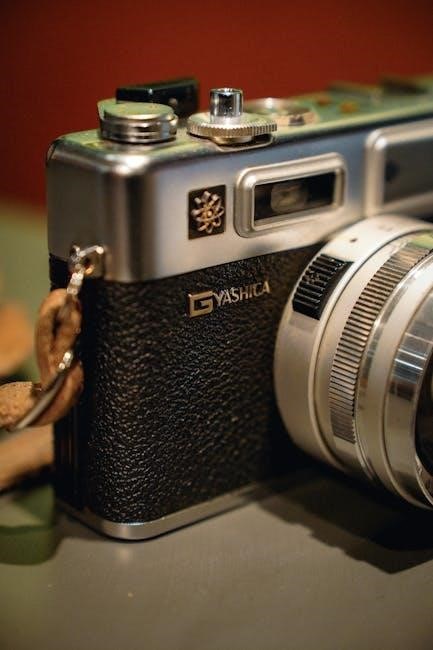
The Yashica 124G boasts a twin-lens reflex design, accepting 120 or 220 film.
Manuals detail key components,
like the viewing and taking lenses,
and built-in exposure meter.
Twin-Lens Reflex (TLR) Design Explained
The Yashica 124G utilizes a classic Twin-Lens Reflex (TLR) design, a system celebrated for its simplicity and unique shooting experience. Unlike Single-Lens Reflex (SLR) cameras, TLRs employ two separate lenses: a viewing lens and a taking lens. The viewing lens is positioned above the taking lens, projecting an image onto a frosted glass screen for composition.
Crucially, the image seen on the viewing screen isn’t directly from the taking lens; this means parallax error can occur, especially at closer focusing distances. Manuals emphasize understanding this offset and utilizing the bright lines or other focusing aids to ensure accurate framing. The taking lens is the one that actually captures the image onto the film.
This separation of lenses eliminates the viewfinder blackout experienced in SLRs during exposure, allowing continuous observation of the subject. Yashica 124G manuals detail how this system functions, explaining the mechanics of interlens shutter operation and the importance of synchronizing the lenses for optimal image quality. The TLR design offers a slower, more deliberate shooting process, fostering a connection between photographer and subject.
Film Format Compatibility: 120 and 220 Film
The Yashica 124G is remarkably versatile, accepting both 120 and 220 film formats. 120 film is the more commonly available option, providing 12 exposures per roll in the standard configuration. The camera’s design accommodates the different spools required for each film type, ensuring proper film advance and rewind.
220 film, offering 24 exposures, was popular for its increased capacity, reducing the frequency of film changes. However, 220 film is becoming increasingly rare. Yashica 124G manuals provide detailed instructions on correctly loading and winding both film types, emphasizing the importance of proper tension and alignment.
Adapters are available to use 120 film backs in cameras designed for 220, but using a dummy spool is crucial to take up the extra space. Understanding the differences in spool sizes and film backing paper is vital for successful operation. Refer to the instruction booklet for specific guidance on selecting the correct settings and ensuring compatibility.
Key Components and Their Functions
The Yashica 124G’s twin-lens reflex (TLR) design features distinct components. The taking lens focuses the image onto the film, while the viewing lens projects an image onto the focusing screen. The focusing knob adjusts the lens position for sharpness, visible on the screen. The shutter speed and aperture controls regulate light exposure, crucial for proper image capture.
The built-in light meter assists in determining correct exposure settings, though manual verification is recommended. The film advance knob moves the film forward after each exposure, and the film counter displays the number of frames used. The winding mechanism requires smooth operation, detailed in service manuals.
The focusing cam plays a vital role in accurate focusing, and adjustments are sometimes needed, as outlined in repair guides. Understanding the interaction of these components – detailed in the instruction booklet – is key to mastering the Yashica 124G and achieving optimal results.
Operating the Yashica 124G
Refer to the instruction booklet for detailed guidance on film loading, exposure settings, and focusing techniques. Mastering these steps,
along with utilizing the built-in light meter,
ensures successful operation.
Loading and Unloading Film
Loading film into the Yashica 124G requires careful attention to detail; Begin by opening the back cover, utilizing the latch release. Select either 120 or 220 film, ensuring it’s compatible with the camera’s design. Secure the film spool onto the film advance knob side.
Carefully thread the film across to the take-up spool, engaging the winding mechanism. Advance the film a couple of times, checking for proper tension and alignment. The red and yellow windows on the backing paper should be observed to confirm film advance.
When unloading, rewind the film completely back onto the original spool using the rewind crank. Once fully rewound, open the back cover and carefully remove the film. Avoid exposing the film to bright light during this process. Proper loading and unloading are crucial for preserving your images and maintaining the camera’s functionality. Refer to the instruction booklet for visual aids and detailed steps.
Setting Exposure: Aperture and Shutter Speed
The Yashica 124G offers manual control over both aperture and shutter speed, essential for achieving correctly exposed photographs. Aperture, adjusted via the lens dials, controls the amount of light entering the camera and influences depth of field. Smaller apertures (higher f-numbers) yield greater depth of field, ideal for landscapes, while larger apertures (lower f-numbers) create shallow depth of field, suitable for portraits.
Shutter speed, controlled by the shutter speed dial, determines the duration of light exposure. Faster shutter speeds freeze motion, while slower speeds allow more light in but can introduce blur. Utilize the built-in light meter as a guide, though understanding the Sunny 16 rule is beneficial for meterless shooting.
Experiment with different combinations of aperture and shutter speed to achieve desired creative effects. Remember that these settings work in tandem to control exposure, and proper adjustment is key to capturing well-balanced images. Consult the instruction booklet for detailed explanations and recommended settings for various shooting scenarios.
Focusing Techniques with the TLR System
The Yashica 124G’s Twin-Lens Reflex (TLR) system utilizes a viewing lens and a taking lens. Focusing is achieved by rotating the focusing knob on the camera’s side, observing the image in the matte screen of the viewing lens. Crucially, what you see is not what the taking lens records; parallax error exists, especially at close distances.
For waist-level viewing, ensure your eye is centered for accurate focusing. The split-image rangefinder in the center of the viewing screen aids in precise focusing – align the two halves for sharpness. At closer distances, compensate for parallax by aiming slightly above the subject.
Practice is key to mastering TLR focusing. Pay attention to the focusing cam adjustments (detailed in service manuals) if experiencing consistent focusing issues. Remember to check focus critically, as the matte screen can sometimes be difficult to read in bright light. A loupe can assist with precise viewing.
Using the Built-in Light Meter
The Yashica 124G features a selenium light meter, activated when the film advance lever is partially depressed. A needle in the viewfinder indicates exposure settings based on the light conditions. However, selenium meters age and can become inaccurate over time, requiring calibration.
To use the meter, point the camera at your subject and partially press the film advance. Observe the needle; it aligns with a scale indicating appropriate aperture and shutter speed combinations. Remember the meter is ‘center-weighted’, meaning it prioritizes the light in the center of the frame.
Exposure meter calibration is crucial for accurate results. Service manuals detail procedures for adjusting the meter. If the meter is unreliable, use an external light meter or the ‘sunny 16’ rule as alternatives. Regularly check the meter’s responsiveness and consider its age when evaluating readings.
Maintenance and Repair
Comprehensive service manuals detail Yashica 124G repair, covering cleaning, common issues, and troubleshooting. Resources include exploded views and guides for winding mechanism and focusing cam adjustments.
Basic Cleaning and Care
Maintaining your Yashica 124G involves gentle cleaning practices to ensure optimal performance and longevity. Begin by using a soft, dry cloth to wipe down the camera body, removing dust and fingerprints. Avoid harsh chemicals or abrasive cleaners, as these can damage the finish. For the lenses, utilize a dedicated lens cleaning cloth and solution specifically designed for photographic optics.
Pay particular attention to the viewing lens and taking lens, ensuring they are free from smudges and debris. Carefully dust the internal components using a blower brush, avoiding direct contact. The film chamber should also be periodically inspected and cleaned to prevent film scratches or malfunctions; Regularly check the light seals for deterioration, as these are crucial for preventing light leaks.
Proper storage is also essential. When not in use, store the Yashica 124G in a cool, dry place, away from direct sunlight and extreme temperatures. Consider using a camera bag or case to protect it from physical damage. Consistent, gentle care will help preserve your Yashica 124G for years to come, allowing you to continue capturing beautiful images.
Common Issues and Troubleshooting
Several common issues can arise with the Yashica 124G, but many are easily addressed. A frequent problem is a stuck winding mechanism; gently attempting to rewind the film slightly can sometimes resolve this. Light leaks often indicate deteriorating light seals, requiring replacement for proper operation. If the exposure meter isn’t functioning, check the battery and ensure it’s correctly installed – calibration may also be needed.
Focusing issues can stem from a misaligned focusing cam, requiring a more advanced repair. Hazy or blurry images often point to dirty lenses, necessitating careful cleaning with appropriate solutions. A stuck shutter can be a more serious problem, potentially requiring professional servicing. Refer to the service manual for detailed diagrams and instructions when attempting repairs.
Before undertaking any repairs, ensure you have the necessary tools and a clear understanding of the camera’s mechanics. If you’re uncomfortable with any aspect of the repair process, it’s best to seek assistance from a qualified camera technician. Remember to document each step to aid in reassembly.
Accessing the Yashica 124G Repair Manual
Locating a Yashica 124G repair manual is crucial for successful maintenance and restoration. Several online resources offer downloadable manuals, often in PDF format. Butkus.us is a well-known archive hosting original Yashica manuals, including the 124G. These manuals provide detailed exploded views, parts lists, and step-by-step instructions for disassembly and repair.
Searching online using keywords like “Yashica Mat 124G service manual” will yield various results, including links to forums and websites where users share documentation. Be cautious when downloading files from unfamiliar sources to avoid malware. Look for reputable websites known for camera repair resources.
Some manuals are comprehensive, covering everything from the winding mechanism to the exposure meter. Others may be partial, focusing on specific components like the focusing cam. Having access to multiple resources can be beneficial for tackling complex repairs. Remember to carefully review the manual before attempting any work on your camera.
Yashica Mat 124G Service Manual Details
The Yashica Mat 124G Service Manual is a detailed technical document designed for camera technicians, but invaluable for dedicated enthusiasts. It delves into the intricate workings of the camera, offering exploded diagrams illustrating each component’s placement and relationship. Key sections cover the exposure meter, detailing calibration procedures and troubleshooting common issues like inaccurate readings.
The manual provides in-depth instructions for servicing the winding mechanism, addressing potential problems like stiff winding or slippage. Focusing cam adjustments are also explained, crucial for maintaining accurate focus across the film plane. Troubleshooting charts assist in diagnosing malfunctions, guiding users through a logical process of elimination.
The service manual often includes electrical schematics, essential for understanding the camera’s circuitry; It’s important to note that these manuals assume a certain level of technical expertise; caution and patience are vital when attempting repairs. Available in PDF format, these documents are a cornerstone for restoring and maintaining the Yashica 124G’s functionality.
Advanced Techniques and Considerations
Mastering the Yashica 124G involves exposure meter calibration, winding mechanism servicing, and focusing cam adjustments. Detailed service manuals provide the expertise needed for optimal performance.
Exposure Meter Calibration
Calibrating the Yashica 124G’s exposure meter is crucial for accurate readings and properly exposed photographs. The service manual details procedures for verifying and adjusting the meter’s sensitivity. Initial checks involve comparing the meter’s readings with a known accurate light source, such as a digital light meter. Discrepancies indicate a need for calibration.
The process typically requires accessing the meter’s internal components, often involving removal of the camera’s back cover. Carefully follow the service manual’s instructions to avoid damaging delicate parts. Adjustment is usually achieved through a small potentiometer, allowing for fine-tuning of the meter’s response. Regular calibration – ideally every few years, or if accuracy is suspect – ensures consistent results.
Factors affecting meter accuracy include battery condition and age of the meter itself. Always use a fresh battery during calibration. Remember that the Yashica 124G’s meter is a selenium cell, which can degrade over time, potentially requiring professional repair or replacement if calibration proves ineffective. Refer to the exploded service manual for component locations and detailed diagrams.
Winding Mechanism Servicing
Servicing the Yashica 124G’s winding mechanism requires careful attention to detail, as it’s a complex assembly. The service manual provides exploded views and step-by-step instructions for disassembly, cleaning, and lubrication. Common issues include stiff winding, incomplete film advance, or a jammed mechanism. Disassembly should be performed on a clean, well-lit surface, keeping track of all small parts.
Cleaning involves removing old lubricant and debris with a suitable solvent. Inspect gears and levers for wear or damage, replacing any faulty components. Lubrication is critical; use a light machine oil specifically designed for cameras, applying it sparingly to moving parts. Avoid over-lubrication, which can attract dust and grime.
Reassembly requires precise alignment of all components. Test the winding mechanism thoroughly after reassembly, ensuring smooth and consistent operation. The manual highlights potential pitfalls and provides guidance on troubleshooting common problems. Remember that a properly maintained winding mechanism is essential for reliable film transport.
Focusing Cam Adjustments
Adjusting the focusing cam on the Yashica 124G is a delicate procedure, typically undertaken when the viewing and taking lenses are misaligned, resulting in inaccurate focus. The service manual details how to access and manipulate the cam, requiring specialized tools and a keen eye for precision. Initial assessment involves projecting an image and comparing the focus points of both lenses.
Adjustment is performed by carefully loosening the cam retaining screws and subtly shifting the cam’s position. Small adjustments are crucial; incremental changes are made while continuously monitoring the lens alignment. A focusing screen with grid lines can aid in precise alignment. Avoid forcing the cam, as this can damage the delicate mechanism.
Re-tightening the screws must be done with utmost care, ensuring the cam remains in the correct position. Post-adjustment testing is vital, verifying accurate focus across the entire focusing range. The manual emphasizes the importance of patience and methodical approach for successful focusing cam adjustments.
Resources for Yashica 124G Users
Numerous online resources cater to Yashica 124G enthusiasts. Butkus.us provides a comprehensive archive of camera manuals, including the 124G’s instruction booklet and feature details, outlining film compatibility and camera type. PDF versions of the repair manual are readily available through various online forums and dedicated photography websites, offering exploded diagrams and troubleshooting guides.
Online communities and forums dedicated to medium format photography are invaluable for seeking advice, sharing experiences, and accessing user-generated repair guides. YouTube tutorials demonstrate common repair procedures, such as light seal replacement and basic cleaning. Exploded service manuals, like those shared by Sarah (sarahdavs1), offer detailed insights into the camera’s internal workings.
These resources collectively empower users to maintain, repair, and fully understand their Yashica 124G cameras; Remember to cross-reference information and exercise caution when attempting repairs, prioritizing safety and careful handling of delicate components.